
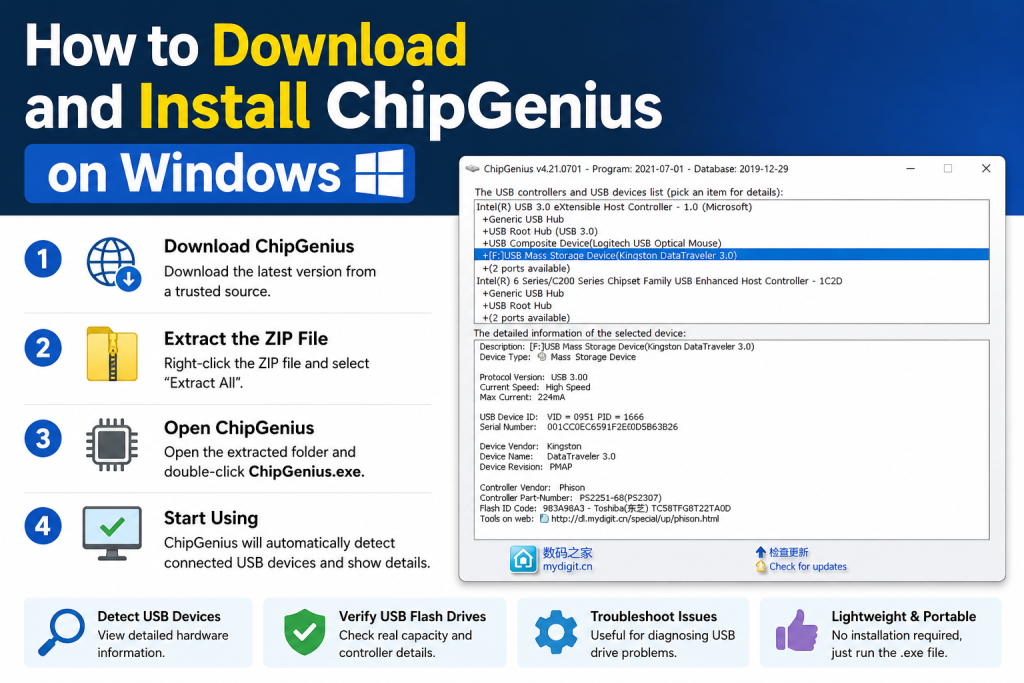
If you often work with USB flash drives, memory cards, or storage devices, you may have come across situations where you need detailed information about the chip inside your device. That’s exactly where ChipGenius comes in.
This lightweight Windows utility helps you identify the controller, firmware, and other technical details of USB flash drives and storage devices. In this guide, you’ll learn how to download and install ChipGenius on Windows in a simple, beginner-friendly way.
Read More: Why Is ChipGenius Not Detecting My USB Device?
What is ChipGenius?
ChipGenius is a small but powerful tool used to detect detailed information about USB devices.
It is commonly used for:
- Identifying USB flash drive chip models
- Checking controller information
- Diagnosing corrupted or fake USB drives
- Finding firmware details for repair tools
It does not require installation in the traditional sense because it is usually a portable application.
System Requirements
Before downloading ChipGenius, make sure your system meets these basic requirements:
- Windows 7, 8, 10, or 11
- Administrator access (recommended)
- USB port (for device detection)
- Minimal storage space (less than 10MB usually)
How to Download ChipGenius on Windows
Follow these simple steps to download the tool safely:
Step 1: Search for a Trusted Source
Open your browser and search for:
“ChipGenius latest version download”
Make sure you choose a reputable software download site to avoid modified or unsafe files.
Step 2: Download the ZIP File
- Click the download button on the website
- The file usually comes in a compressed
.zipformat - Save it to your Downloads folder or desktop for easy access
Step 3: Scan the File (Recommended)
Before opening, it’s a good practice to:
- Right-click the ZIP file
- Scan with Windows Defender or antivirus software
How to Install ChipGenius on Windows
The good news is that ChipGenius doesn’t require a traditional installation process.
Step 1: Extract the ZIP File
- Right-click the downloaded ZIP file
- Select “Extract All” or use WinRAR/7-Zip
- Choose a folder to extract the files
Step 2: Open the Application
Inside the extracted folder:
- Look for
ChipGenius.exe - Double-click to run it
- If prompted, click Yes to allow permissions
Step 3: Connect Your USB Device
- Plug in your USB flash drive or storage device
- ChipGenius will automatically detect and display detailed information
How to Use ChipGenius
Once the tool is open, you’ll see information such as:
- USB Controller Vendor
- Device Name
- VID (Vendor ID) and PID (Product ID)
- Flash memory type
- Firmware version
This information is useful for troubleshooting or repairing USB devices.
Tips for Safe Usage
- Always download from trusted websites
- Avoid modified or cracked versions
- Keep antivirus enabled while downloading
- Do not change system settings unless you know what you’re doing
Common Issues and Fixes
ChipGenius Not Detecting USB
- Try a different USB port
- Reconnect the device
- Restart the software
Application Not Opening
- Run as administrator
- Re-extract the ZIP file
- Check antivirus blocking
Conclusion
Downloading and installing ChipGenius on Windows is a simple process because it is a portable utility that does not require traditional installation. Once extracted, you can instantly use it to analyze USB devices and get detailed hardware information.
If you frequently work with USB drives or face storage issues, ChipGenius can be a very handy tool in your toolkit.